Picture this: you’re strolling through your yard, enjoying the sunshine and fresh air, when suddenly, you trip over a protruding railroad tie.
Ouch. Not only is it a painful experience, but those ties can also be an eyesore in an otherwise beautiful outdoor space.
If you’re nodding your head in agreement, then this blog post is for you. As someone who has battled with removing railroad ties from my own yard, I understand the struggle.
But fear not, my friends – I’ve done the research and put together a guide to help make this task a breeze. So let’s roll up our sleeves and bid farewell to those pesky ties once and for all.
How Do You Remove Railroad Ties From Your Yard?
Contents
- 1 How Do You Remove Railroad Ties From Your Yard?
- 2 Preparation before removing railroad ties
- 3 Step-by-step guide on removing railroad ties
- 4 Disposal options for old railroad ties
- 5 Safety precautions to keep in mind when handling railroad ties
- 6 Tools needed for the removal process
- 7 Tips for making the process easier and safer
- 7.1 Preparation:
- 7.2 Step-by-Step Guide:
- 7.3 Use a pry bar and sledgehammer to gently loosen the tie from the ground. If there are spikes or screws holding it in place, use a screwdriver or drill to remove them.
- 7.4 Repeat this process for each tie until they have all been removed.
- 7.5 Disposal Options:
- 7.6 Proper disposal of old railroad ties is crucial. Before disposing of them, check with your local waste management or recycling center for regulations. Some options for disposal include:
- 7.7 – Donating them to a community garden or park that may have a use for them.
- 7.8 Tips for Safety and Efficiency:
- 7.9 – Use proper lifting techniques, bending your knees and using your legs to lift.
- 8 Conclusion
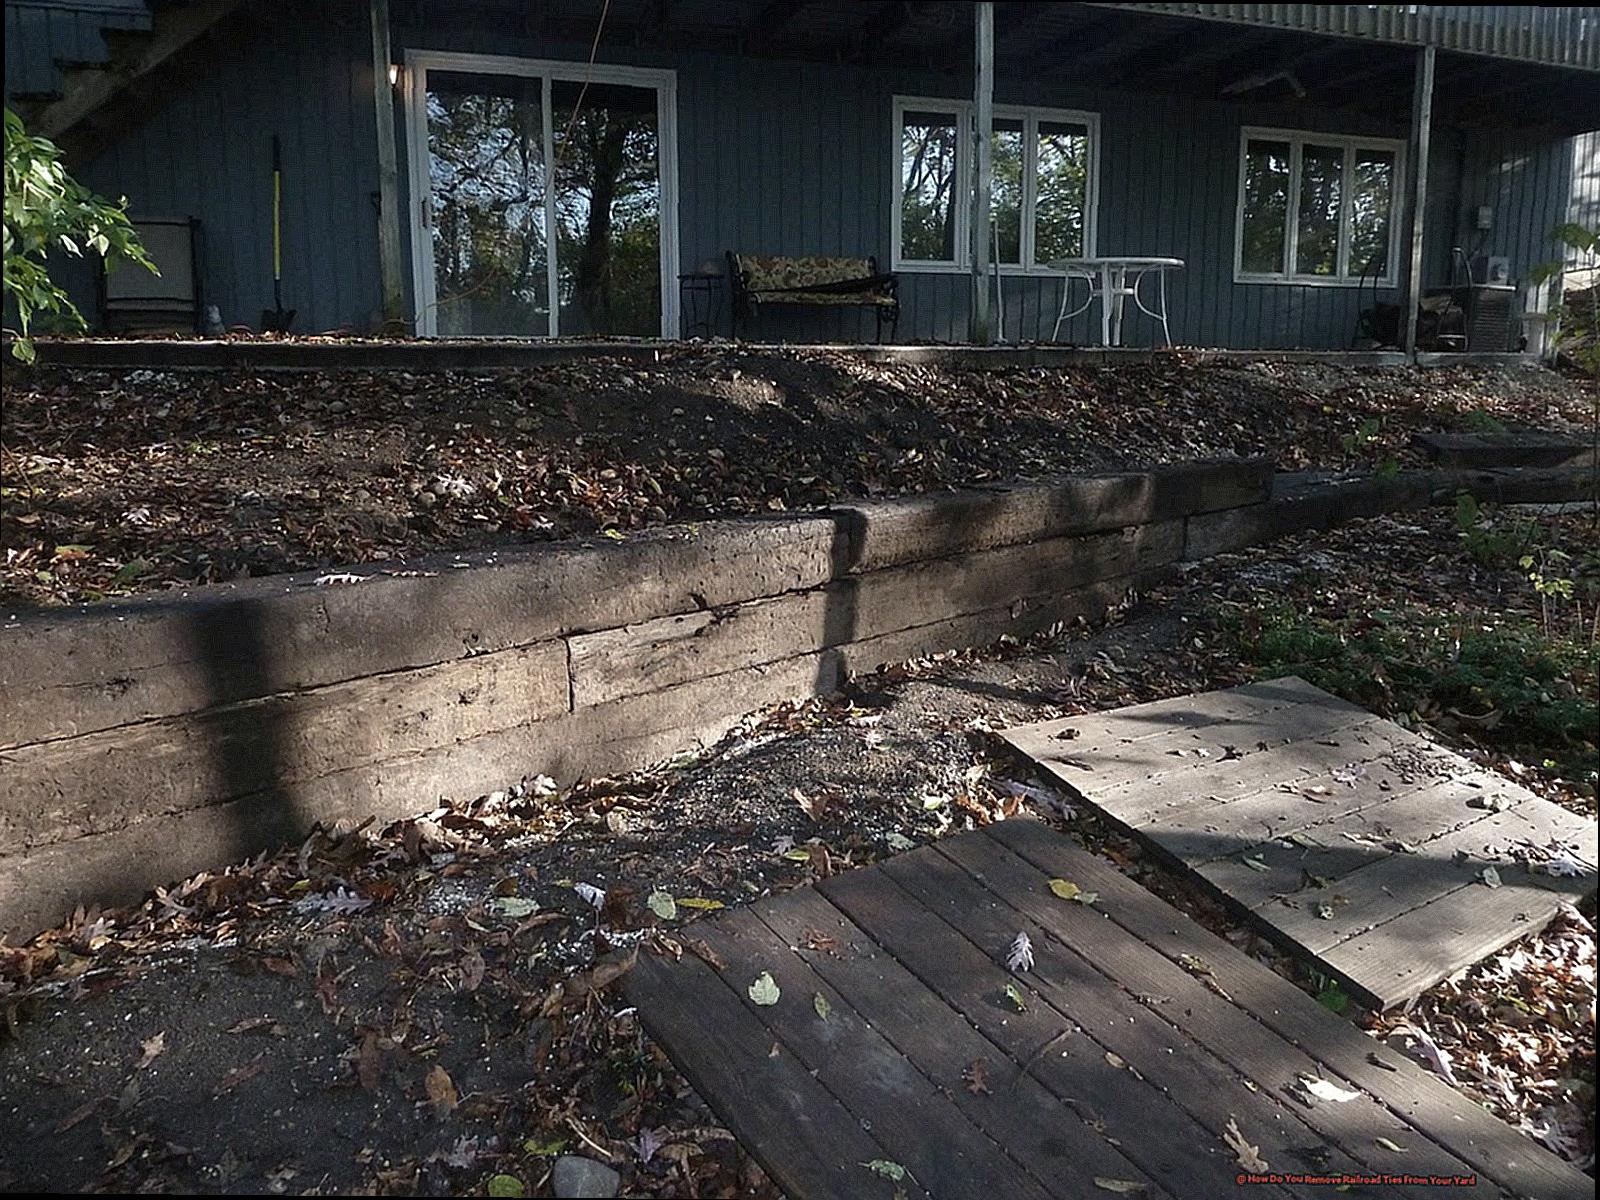
These wooden beams, commonly used for landscaping and retaining walls, can become an eyesore over time. But removing them can seem like a daunting task. Don’t worry – we’ve got you covered with our expert tips for safely and effectively removing railroad ties from your yard.
First, let’s start with the basics. Railroad ties, also known as sleepers, are rectangular beams made of wood or concrete that are used to support railroad tracks. In yards, they are often used for landscaping or as a border for gardens or driveways. However, as they age and weather, they can become damaged and need to be replaced.
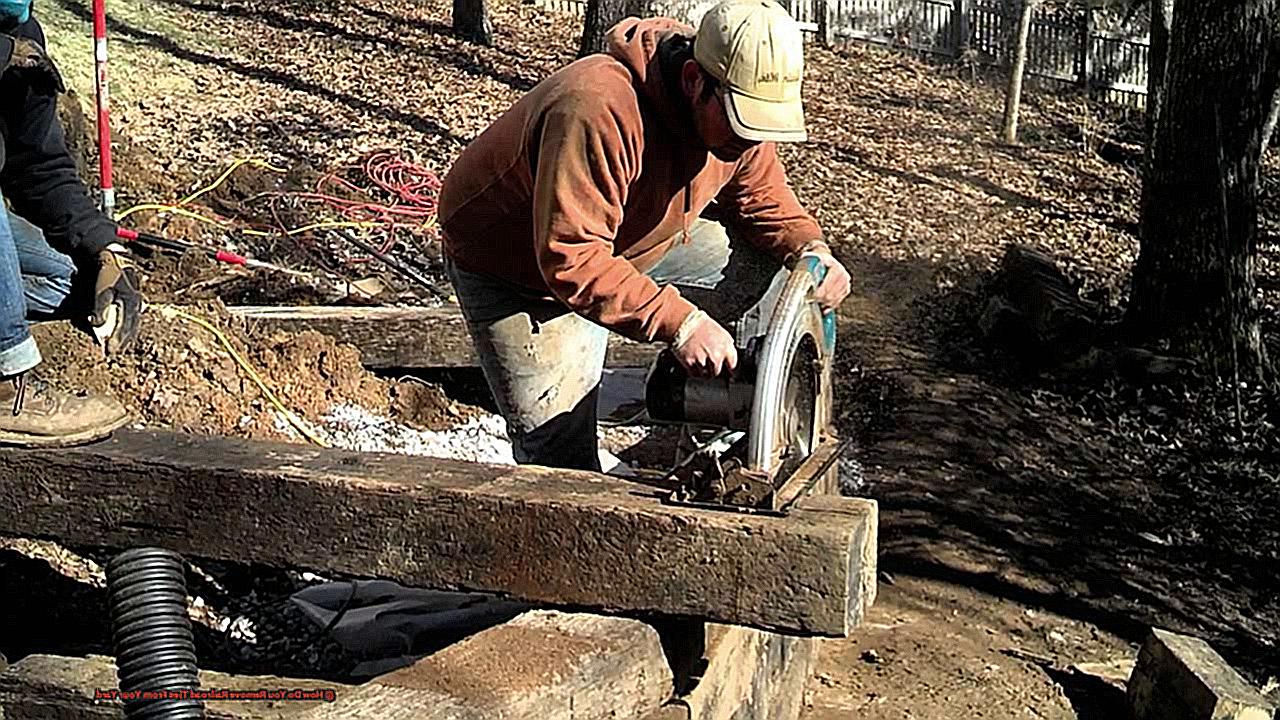
There are two main methods for removing railroad ties: digging them out or cutting them into smaller pieces. Let’s take a closer look at each one.
Digging them out requires using a shovel or digging bar to loosen the soil around the tie and then lifting it out. This method can be physically demanding and may require multiple people, especially if the ties are deeply embedded in the ground. It’s important to wear protective gear and use caution when handling heavy objects.
The cutting method involves using a saw or chainsaw to cut the ties into smaller, more manageable pieces. This method is best if the ties are too difficult to remove with just a shovel. Again, safety precautions should be taken when using power tools.
Before you start the removal process, it’s important to properly prepare. Wear gloves, sturdy shoes, and other protective gear as necessary. You’ll also need tools such as a pry bar, sledgehammer, shovel, and possibly a saw or chainsaw.
Once you have everything you need, follow these steps:
- Start by digging out any dirt or debris around the railroad ties to expose them.
- Use a pry bar and sledgehammer to loosen the ties from the ground.
- If the ties are held together with spikes or screws, use a screwdriver or drill to remove them.
- Once the ties are loosened, use a shovel to lift them out of the ground.
- Repeat this process for each tie until they have all been removed.
Now, what should you do with the old railroad ties? It’s important to check with local regulations before disposing of them. Some options for disposal include contacting a local recycling center, donating them to a community garden or park, or hiring a professional waste removal service.
Preparation before removing railroad ties
Railroad ties can be a pain to deal with in your yard. They are heavy, bulky, and can be difficult to remove. But with the right preparation and techniques, you can have them out of your yard in no time. As an expert on the topic, I have compiled some essential tips and strategies to help you prepare for removing railroad ties.
First things first, assess the number and condition of the railroad ties in your yard. This will give you an idea of the time and effort needed for the removal process. It’s important to know what you’re dealing with before starting.
Next, check for any local regulations or restrictions on the disposal of railroad ties. Some areas may have specific guidelines or require a permit for their disposal. It’s better to know and follow these rules beforehand than face potential fines or penalties later on.
Gathering the necessary tools and materials is also crucial for a smooth removal process. You’ll need a shovel, pry bar, gloves, and a wheelbarrow. Don’t forget to wear protective gear like gloves and closed-toe shoes to avoid any injuries.
Safety should always be a top priority when removing railroad ties. Plan out a safe route for removing them from your yard to avoid any accidents or property damage. If the ties are connected to any plants or structures, it may be best to hire a professional to remove them to prevent any damage.
It’s also important to keep in mind that removing railroad ties can be physically demanding. If possible, enlist the help of a friend or family member or take breaks as needed during the process.
Step-by-step guide on removing railroad ties
Removing railroad ties may seem like a daunting task, but with the right tools and approach, it can be done easily and safely. As an expert on this subject, I’ve compiled my knowledge and research to provide you with a step-by-step guide for removing those pesky ties.
Before starting, it’s important to gather all necessary tools and materials for the job. This includes work gloves, a pry bar, shovel, pickaxe, and a wheelbarrow. It’s also crucial to check with your local government or waste management company for any specific guidelines on disposing of railroad ties in your area. Some areas may have regulations or require special permits, so it’s always best to be informed before starting the removal process.
Next, assess the condition of the ties. If they are in good condition, you may be able to reuse or donate them. However, if they are old and deteriorating, it’s best to dispose of them properly. It’s also important to prioritize safety during this process. Wear work gloves to protect your hands and use caution when using tools like a pry bar or pickaxe.
To begin removing the ties, use a shovel or pickaxe to loosen the dirt around the base of the tie. This will make it easier to lift later on. Then, use a pry bar to lift one end of the tie. If it’s stuck in the ground, you may need to use a pickaxe to break up any roots or rocks that may be holding it in place. Once one end is lifted, use a wheelbarrow to support the weight and slowly move the tie out of its position. If you’re removing multiple ties, repeat this process until all of them are out of the ground.
After all the ties are removed, inspect the area for any remaining debris or roots. Use a shovel or pickaxe to clear out any remaining dirt or obstacles. Then, dispose of the ties properly according to your local guidelines. Some areas may require them to be taken to a designated landfill or recycling center.
Disposal options for old railroad ties
Before you start digging them out, it’s important to know the proper disposal options available to you.
Why is responsible disposal important?
First and foremost, railroad ties are often treated with harmful chemicals like creosote. This means that simply throwing them in the trash or burning them can release these toxins into the environment. Not only is this harmful to the planet, but it can also pose health risks to humans and animals.
Additionally, proper disposal promotes sustainability by reducing waste and potentially repurposing materials for other projects. So let’s dive into the various options for disposing of old railroad ties.
Research, research, research.
The first step in any disposal project is to do your research. Depending on where you live, there may be specific regulations or guidelines for disposing of railroad ties. It’s crucial to check with your local waste management department or landfill to ensure you’re following proper procedures.
Contact waste management services
One option for disposing of old railroad ties is to contact your local waste management company and see if they offer a pick-up service for bulky items. This may come with a fee, so be sure to inquire about any potential costs.
Rent a dumpster
If you have multiple ties to dispose of, renting a dumpster or large waste container may be a more cost-effective option. Just make sure to properly secure the ties within the container.
Donate or check for special collection days
If the railroad ties are still in good condition, consider donating them to a local organization or individual who could repurpose them for landscaping or other projects. Some cities also offer special collection days for large items like railroad ties, so be sure to check with your waste management department to see if this is an option.
Cut and dispose
If none of the above options are available, you may need to cut the ties into smaller pieces and dispose of them in your regular household trash. However, be sure to check with your local regulations first as some areas may not allow treated wood in regular trash. And remember to use proper protective gear when cutting treated wood.
Safety precautions to keep in mind when handling railroad ties
Railroad ties may seem like just another landscaping material, but they actually require careful handling and disposal due to their composition. As an expert on the topic, it is my responsibility to ensure that safety precautions are followed when dealing with railroad ties.
First and foremost, protective gear is a must when handling railroad ties. This includes gloves, long-sleeved shirts, and closed-toe shoes to protect against potential splinters and other hazards. But don’t forget about your respiratory health – wearing a dust mask or respirator is highly recommended as railroad ties are treated with chemicals that can be harmful if inhaled. And let’s not overlook the importance of protecting your eyes – make sure to wear safety glasses when using power tools to remove the ties.
In addition to protective gear, it’s important to have a clear work area and keep children and pets away while handling the ties. These ties can be heavy, so it’s crucial to use proper lifting techniques and avoid twisting or bending your back. If you need assistance, don’t hesitate to ask for help or use equipment like a dolly or wheelbarrow.
Don’t forget about any nails or screws that may be sticking out from the ties – be sure to remove them before handling to prevent any injuries or damage to your equipment. And if the ties are located near utility lines, it’s always better to be safe than sorry – contact your local utility company before attempting to remove them.
Proper disposal of treated wood, including railroad ties, is key for both environmental and health reasons. Burning treated wood releases harmful chemicals into the air, so it’s important to follow the proper disposal guidelines. Contact your local waste management facility for specific instructions on how to dispose of treated wood in your area.
Tools needed for the removal process
Removing railroad ties from your yard may seem like a daunting task, but with the right tools and precautions, it can be a smooth and efficient process. These heavy wooden ties are often used as landscaping materials due to their sturdy and durable nature. However, when it comes time to remove them, it’s important to take the necessary steps to ensure your safety and proper disposal. As an expert on this topic, I have compiled a list of essential tools and precautions for removing railroad ties.
- Heavy-duty gloves – First and foremost, protecting your hands should be a top priority. Railroad ties can have sharp edges and splinters that can cause injury, so make sure to wear heavy-duty gloves throughout the removal process.
- Pry bar or crowbar – A sturdy pry bar or crowbar will come in handy for loosening the ties from the ground. Look for one with a good grip for better leverage.
- Shovel – A shovel is crucial for digging around the ties and loosening them from the soil. It can also be used to remove any debris or dirt that may be covering the ties.
- Hand saw or chainsaw – In some cases, you may encounter ties that are too large or difficult to remove with a pry bar. In these situations, having a hand saw or chainsaw will make cutting them into smaller pieces much easier.
- Wheelbarrow – Once the ties are removed, you’ll need a way to transport them to their disposal location. A wheelbarrow will make this task much easier.
- Eye protection – Along with gloves, wearing eye protection is crucial for your safety while removing railroad ties. This can be in the form of safety glasses or goggles.
- Dust mask – If you are using a chainsaw or sawing through the ties, wearing a dust mask will protect you from inhaling any dust or debris.
- Ropes or straps – For larger ties that cannot fit in a wheelbarrow, ropes or straps can be used to tie and drag them to their disposal location.
It’s important to note that depending on the condition and size of the ties, you may need additional tools such as a sledgehammer or a reciprocating saw. It’s always better to be prepared with a variety of tools to handle any unexpected challenges that may arise during the removal process.
Tips for making the process easier and safer
Railroad ties are a common sight in many yards, often used as borders or retaining walls. However, over time these ties can deteriorate or are no longer needed, leaving homeowners with the task of removing them. But before you start tackling this project, it’s important to know how to do it safely and efficiently. In this guide, we will walk you through the process of removing railroad ties and provide tips for making it easier and safer.
Preparation:
Before you begin removing railroad ties, it’s important to gather all the necessary tools and equipment. This may include a shovel, pry bar, sledgehammer, and safety gear such as gloves, goggles, and sturdy shoes. It’s also a good idea to check for any utility lines or pipes that may be buried near the ties to avoid any accidents.
Step-by-Step Guide:
Start by digging around the perimeter of the tie with a shovel to loosen any dirt or debris.
Use a pry bar and sledgehammer to gently loosen the tie from the ground. If there are spikes or screws holding it in place, use a screwdriver or drill to remove them.
Once the tie is loosened, use a shovel to lift it out of the ground.
Repeat this process for each tie until they have all been removed.
Disposal Options:
Proper disposal of old railroad ties is crucial. Before disposing of them, check with your local waste management or recycling center for regulations. Some options for disposal include:
– Donating them to a community garden or park that may have a use for them.
Tips for Safety and Efficiency:
– Use proper lifting techniques, bending your knees and using your legs to lift.
- Enlist the help of a friend or family member if needed, as railroad ties can be heavy.
- If a tie is too difficult to remove, consider using a saw or chainsaw to cut through it.
Conclusion
In conclusion, removing railroad ties from your yard may seem like a daunting task, but with the right preparation and techniques, it can be done easily and safely. Don’t let these heavy wooden beams become an eyesore – we’ve got you covered with our expert tips for safely and effectively removing them.
We began by discussing the basics of railroad ties and the two main methods for their removal: digging them out or cutting them into smaller pieces. From there, we provided a detailed step-by-step guide for each method, stressing the importance of proper preparation and safety precautions.
But before you start digging up those ties, it’s crucial to know the proper disposal options available to you. The chemicals used in treating these ties make responsible disposal essential. We offered various options such as contacting waste management services or donating them to a community garden.
Additionally, we shared some essential tools needed for the removal process and offered tips for making it easier and safer. Remember to don protective gear, use proper lifting techniques, and enlist help if needed.